Frequently Asked Questions
General Information
-
MIDL (pronounced ʻmiddleʼ) is the acronym for the Melbourne Institute Data Lab. MIDL is a secure, purpose-built data enclave that enables virtual access to micro-level data and aggregated data from various data sources such as the Australian Government at both federal and state levels as well as from other organisations such as businesses and service providers. The MIDL environment aims to facilitate collaboration among researchers and analysts on the study of critical issues important to Australian society.
-
MIDL is a collaboration between the Melbourne Institute, a research department within the Faculty of Business and Economics at the University of Melbourne, and Cyconsol, an Australian-based professional services provider specializing in cybersecurity and ICT capabilities working with the Australian Government and industry. MIDL has been designed by researchers, specifically for researchers and data custodians and builds on over decades of experience in using and managing secure environments for the production of sensitive data assets.
-
MIDL is a PROTECTED level secure enclave with stringent information security controls in place. These controls have been assessed against the Australian Government's Protective Security Policy Framework and the Australian Cyber Security Centre's Information Security Manual. MIDL completed its Information Security Registered Assessor Program (IRAP) Assessment and penetration testing in 2022. Some of MIDL's security controls include (but are not limited to) the use of multi-factor authentication, 24x7 continuous event log monitoring, secure data input and output including the option for vetting and clearance f data in to and out of the system. MIDL backs up all its data to external sites with data retention capability available for up to seven years.
-
-
-
MIDL has been designed to be costed to users on a cost-recovery basis. The MIDL Costing Guide is currently being finalised. This webpage will be updated soon. For more information, please contact us.
-
MIDL is available for researchers from any accredited university, institution or external organisation wishing to undertake activities for research or statistical purposes. These activities and research must be of public interest. MIDL is also available for data custodians who provide data assets for MIDL and require an environment for data production and curation.
-
MIDL has undertaken a Privacy Impact Assessment to ensure good administrative processes and practices are undertaken to ensure user information is handled safely in line with the Australian privacy laws. Please see the MIDL Privacy Collection Notice for more information.
-
FAQs for users
-
Go to https://sso.midl.unimelb.edu.au to log in. Refer to the MIDL User Guide for more details.
-
In the first instance, please check your inbox’s spam folder in case it has been incorrectly flagged as spam to your account. If you still cannot find your activation email, please contact us.
-
Please contact the MIDL Services Team and get allocated into the internal ticketing system by emailing servicedesk@midl.unimelb.edu.au.
-
- Contact the MIDL Service Desk to raise a help ticket.
- Once we receive your request, you will receive an email that will prompt you to sign in and setup Multi-Factor Authentication on a new device.
Other Okta issues
Contact the MIDL Service Desk to raise a help ticket.
-
- Try accessing the login page in incognito mode; see the FAQ “How do I access incognito mode in my browser?" below for instructions.
- If the issue persists in incognito mode, email servicedesk@midl.unimelb.edu.au.
-
Email servicedesk@midl.unimelb.edu.au to open a support ticket.
-
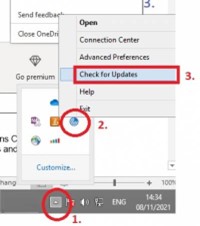
- Outside of MIDL, on your own computer.
- Select the hidden icons menu located on the right side of the taskbar (near the wi-fi and sound icons).
- Locate the blue Citrix Workspace icon and right-click it.
- Select the Check for Updates option from the list that appears.
-
You can bring your own data. Please contact us to discuss this.
You will need to provide relevant data sharing agreements that may apply to your data asset. If required, MIDL Services will need to contact relevant data custodians to discuss how your data is stored and hosted to you through the MIDL in line with the requirements of the aforementioned data sharing agreement.
-
Please acknowledge the Melbourne Institute Data Lab in your publications with the following text:
“This work was conducted using the Melbourne Institute Data Lab (MIDL) secure data enclave provided by the Melbourne Institute: Applied Economic & Social Research at The University of Melbourne.”
Any data services or data sets accessed through the MIDL Platform should be cited using a format similar to that shown below.
“Data Custodian Name (Year of Publication) Data Set Name [Accessed through Melbourne Institute Data Lab], accessed XX Month Year.”
-
If you are an existing user:
- Please contact the MIDL Services Team and get allocated into the internal ticketing system by emailing servicedesk@midl.unimelb.edu.au.
If you are not a user of MIDL:
- Please contact the MIDL Information Team on midl-info@unimelb.edu.au.
Support and service requests
-
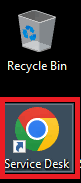
- Open the Service Desk shortcut on your desktop.
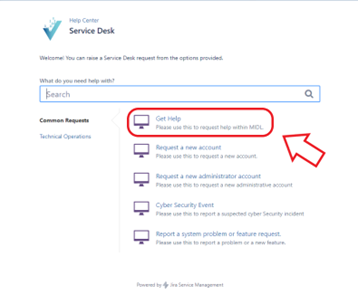
- From the menu that appears, select the Get Help option.
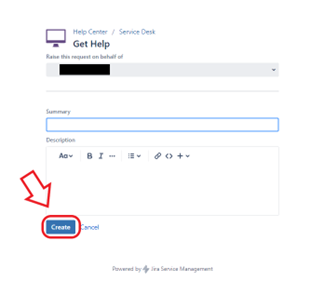
- Fill in the form with relevant details; if the request is being made on behalf of another user, change the name at the top of the form to the user the request is being made for. Make sure to include detailed information on the issue if applicable, including:
- When the issue was first observed.
- What you have already tried to resolve the issue prior.
- If the issue is solely affecting you or multiple people.
- Once the form is filled in, select the Create option to lodge the ticket.
- Wait for a reply from the MIDL Service Desk Team.
- Open the Service Desk shortcut on your desktop.
-
Contact the MIDL Service Desk team and get allocated into the internal ticketing system by emailing servicedesk@midl.unimelb.edu.au with your request.
-
Contact MIDL Service Desk staff, as jobs created by someone else on your behalf can only be updated by that person. The MIDL Information team can update the ticket on your behalf, please email midl-info@unimelb.edu.au. Reference the internal ticket number in your email.
Technical Queries
-
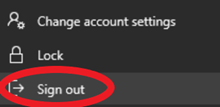
- Locate the Windows button in the bottom left corner of the screen and select it.
- From the menu that appears, select the User button which is located above the Documents button (The appearance of this button may be different from the screenshot below).
- A menu will appear; select Sign out from the options that appear in that menu.

-
- If the desktop is launched in full-screen mode on a single monitor, expand the black bar at the top of your Citrix desktop screen and select Window from the options that appear.

- Move the Citrix desktop window to a location where it spans across both monitors.
- Expand the black bar at the top of your Citrix desktop and select Full Screen from the options that appear.
- Your Citrix desktop will refresh and expand to both screens.
- If the desktop is launched in full-screen mode on a single monitor, expand the black bar at the top of your Citrix desktop screen and select Window from the options that appear.
-
- Close your Citrix desktop session.
- Right-click on the Citrix Workspace App icon on the Windows tray bar.
- Select Advanced from the options that appear.
- Select the High DPI option from the options that appear.
- Select the Use native resolution options that appear.
- Close the menu.
- Right-click on the Citrix Workspace App and select Exit from the options to appear.
- Restart the Citrix Workspace App.
- Follow the instructions to use Citrix VDI with multiple monitors as normal.
-
- Log off all sessions and exit the Citrix software.
- Open file explorer and navigate to C:\Program Files (x86)\Citrix\ICA Client\
- Right-click on the file wfica32.exe
- From the menu that appears, select Properties.
- In the window that appears, select the Compatibility tab.
- In the menu that appears, check the Override high DPI scaling behaviour option.
- Ensure that the Application option is selected.
- Select Ok to close the window and apply the settings.
- Repeat steps 3 through 8 on the file wfcrun32.exe
- The VDI should now be properly aligned with the monitors. If the issue persists after these steps, open a support ticket for assistance.
-
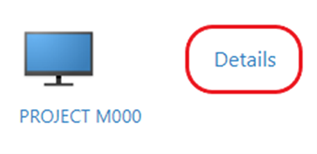
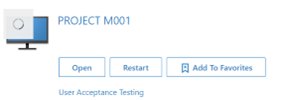
- Locate the MIDL project/virtual machine you wish to restart and click on Details.
- From the options that appear, select Restart.
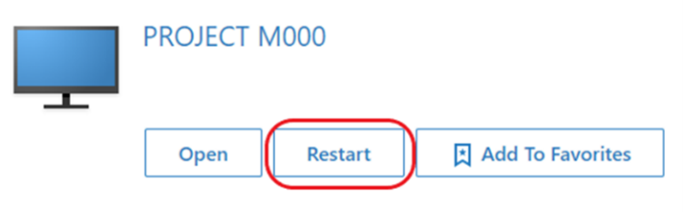
- Wait for the page to load to restart. Once the circular icon/loading status icon disappears, you can click Open.
- Locate the MIDL project/virtual machine you wish to restart and click on Details.
-
The instructions are dependent on your browser and operating system, please follow the appropriate instructions for your browser and device type below:
Google Chrome
- If using a PC or Linux workstation, press Control + Shift + N while Chrome is open.
- If using a Mac workstation, press ⌘ + Shift + N while Chrome is open.
- If using a PC or Linux workstation, press Shift + Control + P while Firefox is open.
- If using a Mac workstation, press Shift + ⌘ + P while Firefox is open.
- On any workstation, press Control + Shift + N while Edge is open.
Mozilla Firefox
- If using a PC or Linux workstation, press Shift + Control + P while Firefox is open.
- If using a Mac workstation, press Shift + ⌘ + P while Firefox is open.
Microsoft Edge
- On any workstation, press Control + Shift + N while Edge is open.
-
Error: "Connection Interrupted" or " Citrix Workspace app will try to reconnect for 0:00 more minutes."
- Close your browser and attempt to re-login from an incognito browser window. See the FAQ “How do I access incognito mode in my browser?” for instructions.
- If the issue persists, contact the MIDL Services Team at servicedesk@midl.unimelb.edu.au.
Citrix VDI Desktop is crashing, or I am getting a “Resource Unavailable” error on login:
- Click on the icon of the project you are trying to log in to and wait a few seconds.
- If you are using the Light version, open the downloaded .ica file.
- If this does not resolve the issue, restart the VDI Desktop.
- If the issue persists, open a support ticket for assistance.
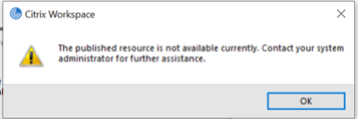
Error: "The published resource is not available currently. Contact your system administrator for further assistance".
All virtual machines/desktops in your project are in use by your research team. For instance, a research team of three may purchase two virtual machines, this only allows two people to log in at once.
Error: "Cannot start desktop "PROJECT M00X" or “Workspace not available” or “Resource not available” error.
This can mean
a) All virtual machines/desktops in your MIDL project are in use by your research team.
b) you and another team member tried to connect to the last available desktop at the same time as someone else, causing a timeout on your start message.
I am receiving a “Failed to launch session. Error code 2517” during Workspace App/Desktop Launch.
If you are receiving an Error 2517 error, attempt to launch the app/desktop again. If the issue persists open a support ticket for assistance.